2023年12月27日水曜日

Bakery Sales Dataset : (1) 基本分析

 Bakery Sales Dataset (https://www.kaggle.com/datasets/akashdeepkuila/bakery)を使って基本分析をしていきます。このデータセットは、「The Bread Basket」というエディンバラにあるベーカリーのオンライン注文取引の詳細を提供しています。2011年1月26日から2003年12月27日までの期間にわたり、20507件のエントリー、9000回以上の取引、4つの列を含んでいます。今回はこのデータセットの基本分析を行なっていきます。データはkaggleのアカウントでログインしてダウンロードしてください。分析環境はGoogle Colaboratoryを使っていきいます。またコードはchatGPTにて生成したものを活用しています。今回は基本分析をしていきますが、流れとしては

(1) データの取り込みと基本統計量の算出

(2) グラフ描画によるデータ特徴把握と相関係数行列によるデータの関係性の把握

(3) 主成分分析による特徴の絞り込みとクラスタリング

の順にやっていきます。ここまでやることで、データが持つ基本的な特徴は掴めると思います。

(1) データの取り込みと基本統計量の算出

csvを取り込んで表示すると、次のようなItems、DateTime、Daypart、DayTypeの項目があり、商品が売られた状況が記録されています。TransactionNOは取引番号(一度での取引、全部で9,465取引)、Itemsは商品名(94種類)、DaypartはMorning, Afternoon, Evening, Nightの4つ、DayTypeはWeekendとWeekdayの2つです。

import pandas as pd
file = 'Bakery.csv'
bakery_data = pd.read_csv(file)
bakery_data
view raw gistfile1.txt hosted with ❤ by GitHub


このデータを以下の方針で集計していきます。
・日毎のトランザクション数
・日毎の販売個数
・DayType (weedday -> 0, weekend -> 1)
・Daypartのそれぞれの販売個数/日(Morning, afternoon, evening, nightそれぞれの販売個数)
・それぞれのItemでの販売個数/日
# Converting the DateTime column to datetime format and extracting the date
bakery_data['DateTime'] = pd.to_datetime(bakery_data['DateTime'])
bakery_data['Date'] = bakery_data['DateTime'].dt.date
# Aggregating data as per the requirements
# Daily transaction count
daily_transaction_count = bakery_data.groupby('Date')['TransactionNo'].nunique()
# Daily total item count (assuming each row represents one item sold)
daily_item_count = bakery_data.groupby('Date')['Items'].count()
# Convert DayType to numeric (weekday -> 0, weekend -> 1)
bakery_data['DayTypeNumeric'] = bakery_data['DayType'].apply(lambda x: 0 if x == 'Weekday' else 1)
# Daily DayType
daily_day_type = bakery_data.groupby('Date')['DayTypeNumeric'].first()
# Sales count by Daypart
sales_by_daypart = bakery_data.groupby(['Date', 'Daypart'])['Items'].count().unstack(fill_value=0)
# Sales count by Item
sales_by_item = bakery_data.groupby(['Date', 'Items'])['Items'].count().unstack(fill_value=0)
# Combining all the aggregated data into one dataframe
combined_data = pd.DataFrame({
'DailyTransactionCount': daily_transaction_count,
'DailyItemCount': daily_item_count,
'DayType': daily_day_type
}).join(sales_by_daypart).join(sales_by_item)
combined_data
view raw gistfile1.txt hosted with ❤ by GitHub
159日分の集約されたデータがデータフレームとして算出されました。基本統計量を出していきます。これを見ると、1日あたりの注文数は59.5件、1日あたりの販売個数は約129個となっています。
combined_data.describe()
view raw gistfile1.txt hosted with ❤ by GitHub

(2) グラフ描画によるデータ特徴把握と相関係数行列によるデータの関係性の把握
グラフを書いて、データの特性を確認していきます。データの特性をグラフから確認してください。
・販売個数と注文数のヒストグラム
# Plotting histograms for Daily Item Count and Daily Transaction Count side by side
fig, axes = plt.subplots(nrows=1, ncols=2, figsize=(12, 6))
# Histogram for Daily Item Count
combined_data['DailyItemCount'].plot(kind='hist', bins=20, title='Daily Item Count', ax=axes[0])
axes[0].spines[['top', 'right']].set_visible(False)
# Histogram for Daily Transaction Count
combined_data['DailyTransactionCount'].plot(kind='hist', bins=20, title='Daily Transaction Count', ax=axes[1])
axes[1].spines[['top', 'right']].set_visible(False)
plt.tight_layout()
plt.show()
view raw gistfile1.txt hosted with ❤ by GitHub
販売個数と注文数は同じような分布に見えるので、一つの注文に対して、2個程度が平均的に販売されているようです。
・DaypartとDayTypeの出現回数
# Aggregate Daypart and DayType data for histograms
daypart_counts = bakery_data['Daypart'].value_counts()
daytype_counts = bakery_data['DayType'].value_counts()
# Plotting histograms for Daypart and DayType side by side
fig, axes = plt.subplots(nrows=1, ncols=2, figsize=(12, 6))
# Histogram for Daypart
daypart_counts.plot(kind='bar', title='Daypart Distribution', ax=axes[0])
axes[0].set_ylabel('Count')
axes[0].spines[['top', 'right']].set_visible(False)
# Histogram for DayType
daytype_counts.plot(kind='bar', title='DayType Distribution', ax=axes[1])
axes[1].set_ylabel('Count')
axes[1].spines[['top', 'right']].set_visible(False)
plt.tight_layout()
plt.show()
view raw gistfile1.txt hosted with ❤ by GitHub

Daypartでは、AfternoonとMorningの出現回数が多いです。
・Daypartごとの販売個数の分布
# Plotting histograms for item counts by each Daypart with the updated terminology
fig, axes = plt.subplots(nrows=2, ncols=2, figsize=(12, 10))
fig.suptitle('Items Count by Daypart')
dayparts = ['Morning', 'Afternoon', 'Evening', 'Night']
for i, daypart in enumerate(dayparts):
# Filter data for each daypart
daypart_data = bakery_data[bakery_data['Daypart'] == daypart]
# Count the number of items sold in each daypart
daypart_item_count = daypart_data.groupby('Date')['Items'].count()
# Plot histogram
ax = axes[i//2, i%2]
daypart_item_count.plot(kind='hist', bins=20, title=f'{daypart} Items Count', ax=ax)
ax.spines[['top', 'right']].set_visible(False)
ax.set_ylabel('Count')
plt.tight_layout(rect=[0, 0.03, 1, 0.95])
plt.show()
view raw gistfile1.txt hosted with ❤ by GitHub
MorningとAfternoonの販売個数が多く、Evening, Nightはかなり少ないです。
・DayTypeでの販売個数の分布
# Preparing the data for histograms of daily item counts for Weekday and Weekend
# Filter data for Weekday and Weekend
weekday_data = bakery_data[bakery_data['DayType'] == 'Weekday']
weekend_data = bakery_data[bakery_data['DayType'] == 'Weekend']
# Count the number of items sold each day for Weekday and Weekend
weekday_item_count = weekday_data.groupby('Date')['Items'].count()
weekend_item_count = weekend_data.groupby('Date')['Items'].count()
# Plotting the histograms overlaid
plt.figure(figsize=(10, 6))
plt.hist(weekday_item_count, bins=20, alpha=0.5, label='Weekday')
plt.hist(weekend_item_count, bins=20, alpha=0.5, label='Weekend')
plt.title('Daily Items Count for Weekday vs Weekend')
plt.xlabel('Items Count')
plt.ylabel('Frequency')
plt.legend()
plt.show()
view raw gistfile1.txt hosted with ❤ by GitHub
Weekendの方が売れている日が多そうです。
・販売個数の時系列変化(Weekendは×印)
# First, group data by date and count the number of items sold each day
daily_sales = bakery_data.groupby('Date')['Items'].count()
# Identify which dates are weekends
weekend_dates = bakery_data[bakery_data['DayType'] == 'Weekend']['Date'].unique()
# Adding a legend entry for weekends using red crosses
# Plotting the time series line plot again
plt.figure(figsize=(15, 7))
plt.plot(daily_sales, label='Daily Items Sold', color='blue', alpha=0.7)
# Marking weekends with red crosses
for date, count in daily_sales.items():
if date in weekend_dates:
plt.scatter(date, count, color='red', marker='x', s=50) # Using 'x' marker for weekends
# Adding legend entries
plt.legend(['Daily Items Sold', 'Weekend'])
plt.title('Time Series of Daily Items Sold (Weekends Marked with Crosses)')
plt.xlabel('Date')
plt.ylabel('Number of Items Sold')
plt.grid()
plt.show()
view raw gistfile1.txt hosted with ❤ by GitHub
・商品の販売個数ランキングと累積販売個数が80%を超える上位商品
# Calculating the total number of each item sold and sorting them
item_sales_counts = bakery_data['Items'].value_counts().sort_values(ascending=False)
# Calculating the cumulative sales count and the 80% threshold
cumulative_sales = item_sales_counts.cumsum()
total_sales = cumulative_sales.iloc[-1]
eighty_percent_threshold = total_sales * 0.8
# Finding the item where the cumulative sales exceed 80% of the total sales
threshold_item = cumulative_sales[cumulative_sales > eighty_percent_threshold].index[0]
# Plotting the histogram of item sales counts
plt.figure(figsize=(15, 10))
item_sales_counts.plot(kind='bar')
# Marking the item where the cumulative sales exceed 80% of the total
threshold_item_position = list(item_sales_counts.index).index(threshold_item)
plt.axvline(x=threshold_item_position, color='green', linestyle='--')
plt.title('Histogram of Item Sales Counts with 80% Sales Threshold')
plt.xlabel('Items')
plt.ylabel('Sales Count')
plt.show()
view raw gistfile1.txt hosted with ❤ by GitHub
左の上位数商品が全体の販売個数の80%を占めていることがわかります。パレートの法則で、商品の20%が販売個数の80%を占めているということです。
・Daypartでの販売個数/日と総販売個数/日の相関係数行列
import seaborn as sns
# Counting the number of items sold in each daypart for each day
daypart_sales_counts = bakery_data.groupby(['Date', 'Daypart']).size().unstack(fill_value=0)
# Merging the daypart sales counts with the daily item count
combined_daypart_daily = daypart_sales_counts.join(daily_item_count.rename('Total_Daily_Sales'))
# Calculating the correlation matrix for the combined data
correlation_matrix_daypart_daily = combined_daypart_daily.corr()
# Plotting the heatmap of the correlation matrix
plt.figure(figsize=(8, 6))
sns.heatmap(correlation_matrix_daypart_daily, annot=True, cmap='coolwarm')
plt.title('Correlation Matrix of Daypart Sales and Total Daily Sales')
plt.show()
view raw gistfile1.txt hosted with ❤ by GitHub
MorningとAfternoonでの販売個数が総販売個数と関係が高いことがわかります。
・販売個数の上位20%(累積販売個数の20%)の商品の販売個数/日と総販売個数/日の相関係数行列を作成
# Identifying the items that make up 80% of total sales
top_items = item_sales_counts.cumsum().sort_values(ascending=False)
top_items = top_items[top_items <= eighty_percent_threshold].index
# Filtering data for only the top items
filtered_data = bakery_data[bakery_data['Items'].isin(top_items)]
# Counting the number of each top item sold each day
daily_top_item_sales = filtered_data.groupby(['Date', 'Items']).size().unstack(fill_value=0)
# Merging the daily top item sales with the daily total sales
combined_top_items_daily = daily_top_item_sales.join(daily_item_count.rename('Total_Daily_Sales'))
# Calculating the correlation matrix for this data
correlation_matrix_top_items_daily = combined_top_items_daily.corr()
# Plotting the heatmap of the correlation matrix
plt.figure(figsize=(12, 10))
sns.heatmap(correlation_matrix_top_items_daily, annot=True, cmap='coolwarm')
plt.title('Correlation Matrix of Top Item Sales per Day and Total Daily Sales')
plt.show()
view raw gistfile1.txt hosted with ❤ by GitHub
CoffeeとBreadとの関係性、総販売個数の関係性が高いことがわかります。

(3) 主成分分析による特徴の絞り込みとクラスタリング
次に主成分分析を行います。今回は商品数が多いので、販売個数の多いものから並べ替えをして、累積販売個数が全体の販売個数の80%を超えるまでの商品で実施します。今回選ばれたのは、'Coffee', 'Bread', 'Tea', 'Cake', 'Pastry', 'Sandwich', 'Medialuna', 'Hot chocolate', 'Cookies', 'Brownie', 'Farm House', 'Muffin', 'Alfajores' の13商品です。
これに1日の販売数を加えた14要素で主成分分析を行います。
from sklearn.decomposition import PCA
from sklearn.preprocessing import StandardScaler
import numpy as np
# Filtering out the top items that make up 80% of the sales
top_items = item_sales_counts[item_sales_counts.cumsum() <= eighty_percent_threshold].index
print('Filtering out the top items that make up 80% of the sales : {}'.format(list(top_items)))
# Selecting sales data for these top items
filtered_top_items_data = bakery_data[bakery_data['Items'].isin(top_items)]
daily_top_items_sales = filtered_top_items_data.groupby(['Date', 'Items']).size().unstack(fill_value=0)
# Adding the daily total sales to the daily top items sales data
daily_top_items_sales_with_total = daily_top_items_sales.join(daily_item_count.rename('Total_Daily_Sales'))
# Standardizing the combined data
scaler = StandardScaler()
standardized_combined_data = scaler.fit_transform(daily_top_items_sales_with_total.fillna(0))
# Applying PCA to the combined data
pca_combined = PCA(n_components=0.80)
principal_components_combined = pca_combined.fit_transform(standardized_combined_data)
# Number of components PCA chose
n_components_combined = pca_combined.n_components_
# Creating a DataFrame for the PCA components including the total daily sales
pca_components_combined_df = pd.DataFrame(pca_combined.components_, columns=daily_top_items_sales_with_total.columns)
# Calculating the explained variance for each principal component
explained_variance_combined = pca_combined.explained_variance_ratio_
# Calculating cumulative explained variance
cumulative_explained_variance = np.cumsum(explained_variance_combined)
# Re-applying PCA to the combined data (including the total daily sales)
pca_combined = PCA(n_components=0.80)
principal_components_combined = pca_combined.fit_transform(standardized_combined_data)
# Adding these values to the DataFrame
pca_components_combined_df['Explained Variance'] = explained_variance_combined
pca_components_combined_df['Cumulative Explained Variance'] = cumulative_explained_variance
# Plotting the biplot for the combined data
def biplot(score, coeff, labels=None):
xs = score[:,0]
ys = score[:,1]
n = coeff.shape[0]
scalex = 1.0/(xs.max() - xs.min())
scaley = 1.0/(ys.max() - ys.min())
plt.scatter(xs * scalex, ys * scaley)
for i in range(n):
plt.arrow(0, 0, coeff[i,0], coeff[i,1], color='r', alpha=0.5)
if labels is not None:
plt.text(coeff[i,0]* 1.15, coeff[i,1] * 1.15, labels[i], color='g', ha='center', va='center')
plt.figure(figsize=(12, 8))
biplot(principal_components_combined, np.transpose(pca_combined.components_[0:2, :]), labels=daily_top_items_sales_with_total.columns)
plt.xlabel('PC1')
plt.ylabel('PC2')
plt.title('Biplot of PCA (Including Total Daily Sales)')
plt.show()
pca_components_combined_df
view raw gistfile1.txt hosted with ❤ by GitHub
(課題) このbiplotのそれぞれの点が日付を表しているが、平日と休日を区別して表示しなさい。

次に、それぞれの主成分がどの商品に影響を受けているかをヒストグラムで可視化します。
# Total_Daily_Sales、Explained Variance、Cumulative Explained Varianceの列を除外
data = pca_components_combined_df.drop(columns=['Total_Daily_Sales', 'Explained Variance', 'Cumulative Explained Variance'])
# 各行の要素をヒストグラムで表示
for index, row in data.iterrows():
plt.figure(figsize=(8, 4)) # プロットのサイズを設定
plt.xticks(rotation=90) # x軸ラベルを縦に表示
plt.bar(row.index, row.values) # 棒グラフを作成
plt.xlabel('Columns') # x軸ラベル
plt.ylabel('Values') # y軸ラベル
plt.title(f'Histogram for PC {index}') # グラフのタイトル
plt.show() # グラフを表示
view raw gistfile1.txt hosted with ❤ by GitHub


以下省略。主成分の名前をつけるのですが、今回はGPTでの出力を載せておきます。
  1. PC0 - "総合的な販売トレンド": この主成分は、ほとんどの商品(特に「Coffee」や「Total_Daily_Sales」)に高い荷重を持っており、全体的な販売トレンドや人気商品の影響を捉えている可能性があります。

  2. PC1 - "スナック類の傾向": この成分は、「Cake」や「Cookies」などのスナック類に負の荷重を持ち、これらの商品の販売パターンを反映している可能性があります。

  3. PC2 - "朝食・軽食アイテムの影響": 「Brownie」、「Medialuna」、「Hot chocolate」などの朝食や軽食向け商品に高い荷重を持っていることから、これらの商品群の販売動向を示している可能性があります。

  4. PC3 - "特定アイテムの特異性": 特定の商品(例えば「Farm House」や「Sandwich」)に高い荷重を持つことから、これらの商品の特異な販売傾向を捉えている可能性があります。

  5. PC4 - "パン類の影響": 「Bread」に正の荷重を、「Pastry」や「Sandwich」に負の荷重を持っていることから、パン類の販売動向とその他の商品群との関連性を示しているかもしれません。

主成分分析の結果を用いて、クラスタリングをしていきます。今回は4つのクラスタに分類します。
from sklearn.cluster import KMeans
# Clustering
# Number of clusters
n_clusters = 4
kmeans = KMeans(n_clusters=n_clusters, random_state=0)
clusters = kmeans.fit_predict(combined_top_items_daily)
# Creating a DataFrame for the PCA components
pca_df = pd.DataFrame(principal_components_combined, columns=[f'PC{i+1}' for i in range(n_components_combined)])
pca_df['Cluster'] = clusters
# Explained variance
explained_variance = pca_combined.explained_variance_ratio_
cumulative_explained_variance = np.cumsum(explained_variance)
def biplot_with_shapes_and_legend(score, coeff, clusters, labels=None):
xs = score[:,0]
ys = score[:,1]
n = coeff.shape[0] # Number of components
scalex = 1.0/(xs.max() - xs.min())
scaley = 1.0/(ys.max() - ys.min())
# Scatter plot with different shapes for each cluster
shapes = ['o', 's', '^', 'D'] # Different shapes for each cluster
for cluster in range(n_clusters):
plt.scatter(xs[clusters == cluster] * scalex, ys[clusters == cluster] * scaley,
c=np.random.rand(3,), marker=shapes[cluster], label=f'Cluster {cluster + 1}')
# Plotting arrows and labels for each principal component
for i in range(n):
plt.arrow(0, 0, coeff[i,0], coeff[i,1], color='r', alpha=0.5)
if labels is not None and i < len(labels):
plt.text(coeff[i,0]* 1.15, coeff[i,1] * 1.15, labels[i], color='g', ha='center', va='center')
# Adding a legend
plt.legend()
# Plotting the modified biplot
plt.figure(figsize=(12, 8))
biplot_with_shapes_and_legend(principal_components_combined, np.transpose(pca_combined.components_[0:2, :]), clusters, labels=daily_top_items_sales_with_total.columns)
plt.xlabel('PC1')
plt.ylabel('PC2')
plt.title('Biplot of PCA (Including Total Daily Sales) with Clusters')
plt.show()
view raw gistfile1.txt hosted with ❤ by GitHub
(課題) この分類されたクラスタに特徴とともに名前をつけましょう。
ここまでの基本分析をやることで、データの特徴を捉えることができます。

2023年12月8日金曜日

EC2でWordpressをインストールする

 前回の続きです。

Wordpressとは?
chatGPT:WordPressはWebサイト構築用のオープンソースの内容管理システム(CMS)です。PHP言語とMySQLデータベースを使って、複数のユーザーがサイトのコンテンツを管理、更新、作成できるようにするものです。WordPressを使うことで、プログラミングの知識を必要とせずに、ウェブサイトを作成することができます。WordPressは何千ものオープンソース資産として提供されており、高度なソフトウェアを含むことも非常に容易になっています。

[前提条件]
・今までのEC2の設定ができていること


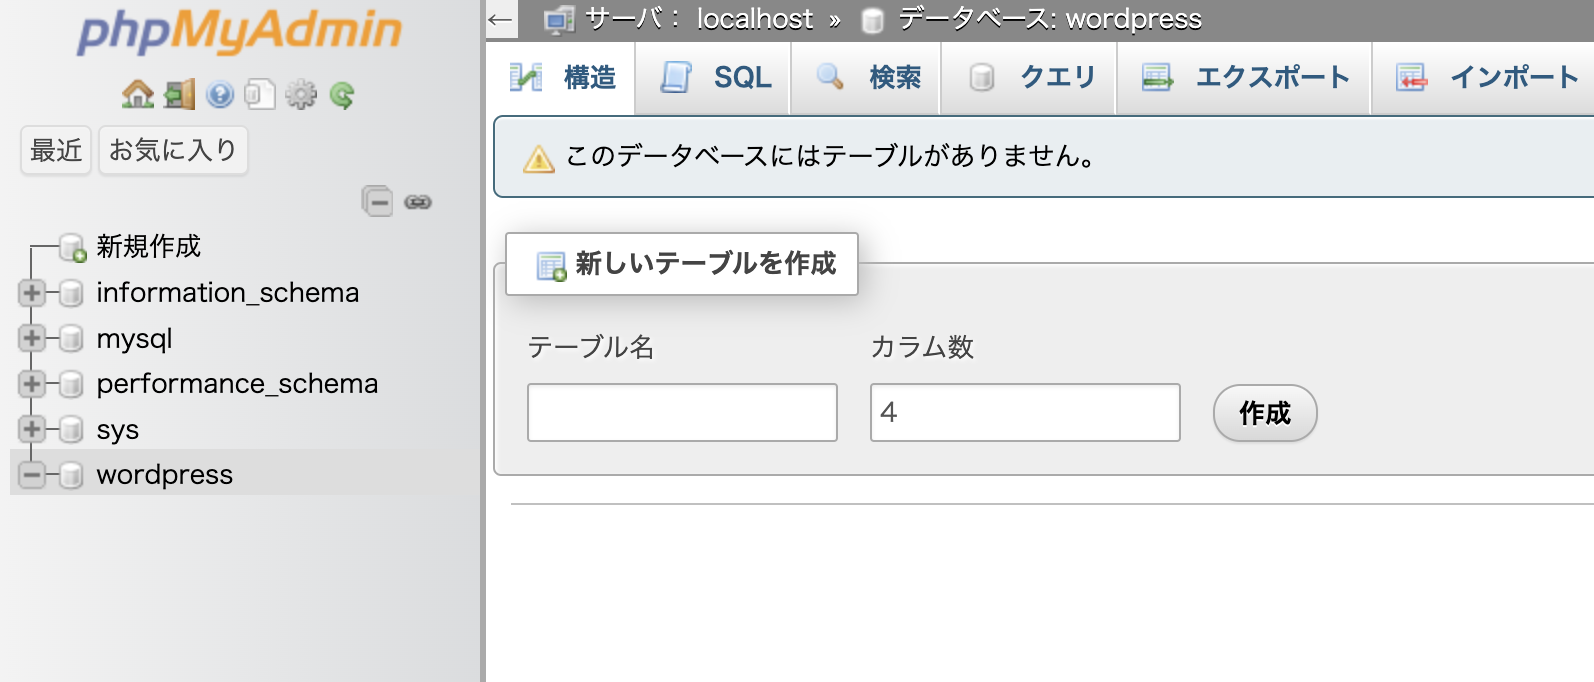
1. phpMyAdminにWordpress用のデータベースを作成する
http://ecX-XX-XXX-XXX-XX.compute-1.amazonaws.com/phpMyAdmin/ にアクセスし、Wordpress用のデータベースを作成します
データベース>作成をクリック
データベース名:wordpress
照合順序:utf8mb4_general_ci とします


作成すると、テーブルの作成が求める画面が出てきますが、スルーしてください

2. Wordpressダウンロードためにwgetをインストール(EC2ではすでにインストール済みのため不要
前提:root権限のあるユーザ(ec2-user)になっておいてください。
   そのほかのユーザの場合は、exitをしてec2-userになってください。

 wgetとは?
 chatGPT:wgetはウェブサイトからファイルを取得するコマンドラインプログラムである。 
 wgetはHTTP、HTTPS、FTPプロトコルを使用してファイルを取得することができ、定期的にファイルを取得できる便利なオプションも備えている。

$ sudo yum install wget


3. Wordpressインストール
ここでは、Wordpressをインストールしたいユーザで作業していきます。
今回はlinuxユーザ内にインストールしたいため、linuxユーザに移動しておきます。
$ su - linux

wwwフォルダに移動し、学籍番号名のディレクトリの中に環境を作成してこうと思います。
今回学籍番号はdsXXXXXXXとしておきます。
$ cd www/
$ mkdir dsXXXXXXX
$ cd dsXXXXXXX/

ここでwordoressをダウンロードします。
$ wget https://ja.wordpress.org/latest-ja.tar.gz

ダウンロードしたもの圧縮ファイルのため展開していきます。
$ tar xzvf latest-ja.tar.gz 
chatGTP:tar xzvf latest-ja.tar.gz は、tar形式のファイル latest-ja.tar.gz を展開するコマンドです。x、z、およびvオプションを利用することで、圧縮ファイルの解凍を行える他、詳細な展開情報を表示することができます。


4.wordpressの設定
wordpressにアクセスします
http://ecX-XX-XXX-XXX-XX.compute-1.amazonaws.com/~linux/dsXXXXXXX/wordpress

さあ、始めましょう!を選択して情報を入力していきます。
データベース名:1で作成したデータベース名としてください
ユーザ名:root (データベースでログインするときのユーザ名)
パスワード:データベースに設定したパスワード(今回の場合はLinuxOS99@)

wp-config.php ファイル(wordpressの設定ファイル)に書き込み
書き込みができないとの表示がされます。でできた表示を、wordpressフォルダ内にwp-config.php を作成し書き込みをしてください。
※行数が多いので忘れすべてコピーしてください

$ cd wordpress/
$ vi wp-config.php
  ※この中に画面表示されている内容をコピペして保存
  このとき、編集モードに入って貼り付けるとEC2側で自動インデントが入り、意図した通りの貼り付けができません。
  そのため編集モード(i)に入る前に、自動インデントモードではなくペーストモードに変更しておきましょう。
  :set paste にて自動インデントモードになり、編集モードになった際には-- INSERT (paste) --  の表示になります。


貼り付けができたら、wordpressに戻ってインストール実行します。
ここでサイト情報を入力し、wordpressをインストールします。
今回は下記の内容とします。
サイトのタイトル、ユーザ名:学籍番号
パスワード:LinuxOS99@
        脆弱なパスワードの使用を確認にチェックをつける
メールアドレス:自分のメールアドレス(大学のもの)
検索エンジンがサイトをインデックスしないようにする:チェックをつける

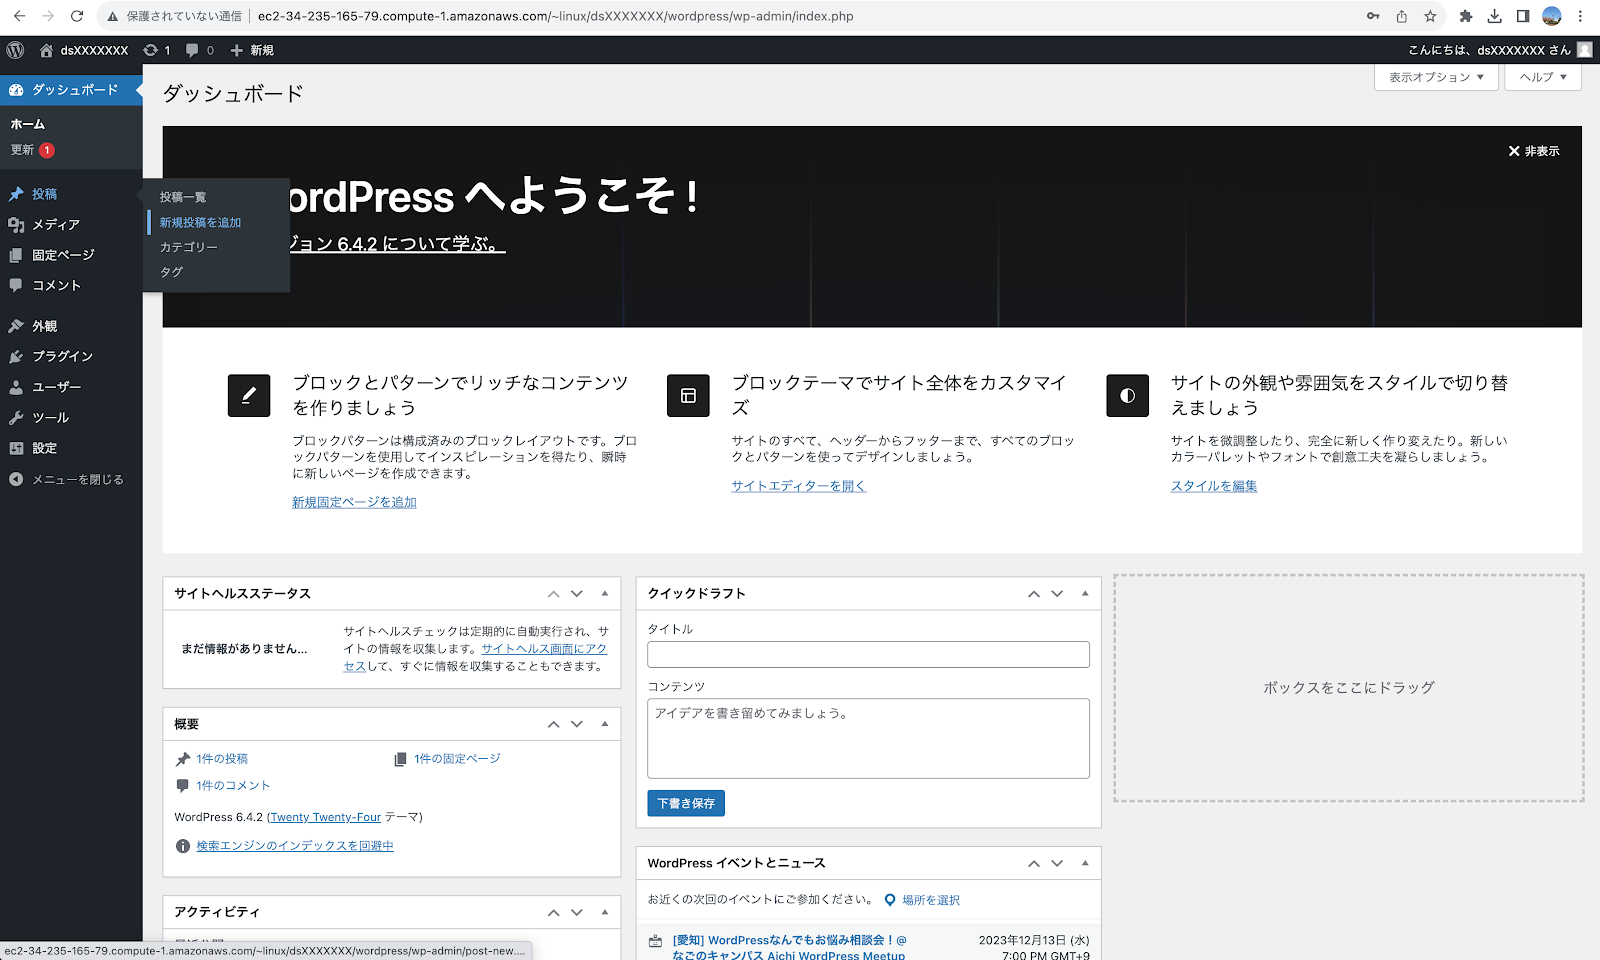
インストールが完了すると次のような画面が出てきます。

5. ログインしてブログ記事を追加(情報公開)する
ユーザー名、パスワードを入力してログイン

ダッシュボード画面の左にある投稿>新規投稿を追加を選択

ブロックエディタにようこそ が出てきたら×を選択して画面表示を消す

何かブログを作成する※試験では指定されたものを入力してください
入力して右上の[公開]ボタンを押してから、wordpressを再読み込みするとブログが追加されています。※wordpressのサイトをスクロールすると現れます。

画像をアップロードするには、フォルダ権限の設定が必要となります。

そこでwordpressフォルダ内のwp-contentフォルダの中に、uploadsフォルダを作成し権限を付与します。
 前提:
  wordpressをインストールしているユーザであること
  wordpressフォルダ内にいること
$ cd wp-content/
$ mkdir uploads
$ chmod 777 uploads/

上記の設定が完了したら、画像を投稿してみましょう。

次のように画像が投稿できていたらOKです

試験では、このとき管理画面のアドレスではなく、外部からアクセスできるアドレスを投稿してください
例(アクセスできません):http://ecX-XX-XXX-XXX-XX.compute-1.amazonaws.com/~linux/dsXXXXXXX/wordpress/index.php/2023/12/08/dsxxxxxxx/
投稿画面の右側にも記載されています


以上

2023年11月24日金曜日

EC2でDirectoryIndexを廃止する

 ディレクトリインデックス(DirectoryIndex)とは、ウェブサイト内のディレクトリやファイルの一覧として収録されているインデックスページのことです。単にインデックスとして示されている物の事で、ディレクトリの中を探索して、個々のファイルを見つけるための一番簡単な手段となります。

例えば今、
http://ec**-**-**-**.compute-1.amazonaws.com/~linux/security/
にアクセスしてみるとlinuxユーザの公開フォルダ内のsecurityフォルダの中身が見えています。

このようにフォルダの中身が見えていると、見せるはずではなかったものもユーザに見られてしまいます。なので、 ディレクトリインデックス(DirectoryIndex)を廃止し、フォルダの中身一覧が見られないようにしていきます。


前提
・ec2-userの状態であること
 もしもlinuxユーザの場合は、exitでec2-userになっておいてください


ユーザディレクトリの設定ファイルを変更
$ sudo  vi /etc/httpd/conf.d/userdir.conf 

33行目にあるIndexesを削除する
before
after

webサーバを再起動
$ sudo systemctl restart httpd.service 

もう一度アクセスして下記のような画面が出ていればOK


EC2でbasic認証をつける